Embedded Zapier
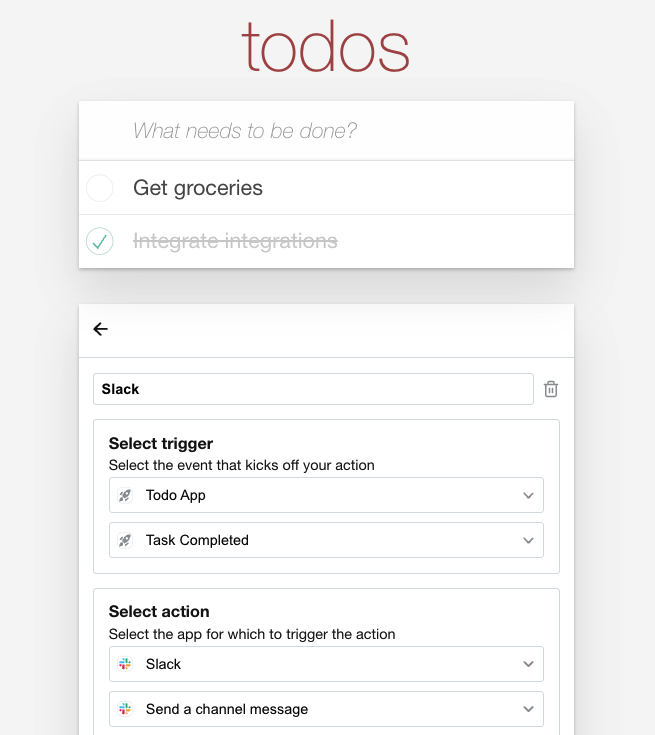
Rollout's UI components allow you to embed Zapier-like functionality directly in your app. For an example, see the Rollout Todo App, where we've modified a simple todo app to enable users to exeucte Actions in third party apps, like sending an email with Gmail or creating an Asana task whenever they create or complete a task:
This guide will help you get up and running with a similar implementation in four steps.
1. Authenticate with Rollout#
You'll first need to generate a Rollout JWT using the credentials you'll find in the Rollout dashboard.
2. Render the Embedded UI#
The easiest way to embed Zapier-like functionality in your app is to use the AutomationsManager Component, which allows you to embed the entire experience of creating and updating automations in one place.
You can render the UI Component in a few different ways, either by adding an HTML script tag to a webpage or import it as a React component or as a component within another frontend framework. To learn more about how to render it, see the installation guide.
In the example code below we're leveraging Rollout's Default Theme for relatively neutral styling. However, the relevant classnames are exposed so that you can style the UI to match the look and feel of your app.
AutomationsManager Example Code#
import {RolloutConnectProvider,AutomationsManager,defaultTheme,} from "@rollouthq/connect-react";function App() {return (<RolloutConnectProvidertoken="JWT_TOKEN_FROM_STEP_1"allowedApps={["gmail", "googleCalendar"]}><AutomationsManager /></RolloutConnectProvider>);}defaultTheme();
3. Define Triggers#
Triggers are the types of events emitted by your app that can be used as input to Actions in other apps. For an event booking app, this might correspond to "New Event Booked"; for a todo app, this might correspond to "Task Created" or "Task Completed".
Learn more about creating Triggers here.
4. Send Trigger Events to Rollout#
If you're using REST Hook Triggers, you're all set! Every time a user creates an Automation using one of your Triggers, Rollout will subcribe to the relevant Webhook and trigger the automation as events come in.
If you're not using REST Hook Triggers, the final step is to start sending trigger events from your application. You'll send a POST request with a JSON body where the triggerKey property is the key you've defined when creating your trigger and the payload is data corresponding to the schema you defined in the Data tab.
Sending a Trigger Event Example Code#
const res = await fetch("https://api.rollouthq.com/trigger-event", {method: "POST",body: JSON.stringify({triggerKey: "taskCompleted",payload: {task_name: "Buy Groceries",due_date: "2022-07-21T01:30:03+00:00",},}),headers: { "Content-Type": "application/json" },});